Pistol Drills
Training with firearms is an inherently dangerous activity. Be sure to follow all safety protocols when using firearms or practicing these drills. These drills are provided for information purposes only. Use at your own risk. Some of these drills are for advanced shooters, and should not be attempted without sufficient training.
1-Reload-2
Range: 5yd
Target: torso zone (IPSC A-zone, IDPA zero-down, 8″ plate, 8.5×11 paper)
Start position: gun aimed in on target
Rounds fired: 3
This is a close-range drill that should allow you to practice your reload and re-acquisition of the target as quickly as possible. Remember, don’t go so fast that you miss the target regularly.
The drill begins with the shooter aiming at the target, finger on the trigger. On the start signal, fire a single round at the target. Then perform a reload and fire two more rounds at the target. This is an improvement over the traditional 1-reload-1 drill because by requiring two shots after the reload, the shooter is forced to get a good grip and visual awareness of the pistol after the reload in order to control the gun and get two accurate and fast hits.
Depending on how you perform the drill, your reload can be a slidelock (aka emergency) reload, a speed (aka in-battery) reload, or a retention (aka tactical) reload.
In this video, the shooter begins from a ready position instead of aimed in at the target; note also that he properly decocks his Traditional Double Action pistol when bringing it back to a ready position.
26662 Drill
by Todd Green
Range: 3yd - 7yd
Target: special (see below)
Start position: holstered
Rounds fired: 5
This is a more advanced variation on the Changing Gears drill. It uses a target with two 2″ circles and one 6″ circle.

(click image for printable version)
Range can be anywhere from three to seven yards depending on shooter skill level.
Draw and fire one round at the top 2″ circle, three rounds at the 6″ circle, and then one round at the bottom 2″ circle. Shoot the circles in that specific sequence. Record your time and establish a good par time for yourself. Then start to chip tenths of a second off the par to improve your speed. Once you are consistently getting all of your hits within 3-4 seconds, try putting the target out another yard or two and starting again.
To keep the drill from getting stale and to keep you from getting too familiar with the specific movement from circle to circle, rotate the target to a different orientation each range session. So sometimes the little dots will be on the right, sometimes of the left, sometimes on top, and sometimes on bottom.
The 26662 drill will help you develop a good, precise draw and the ability to change between high accuracy shots and high speed shots seamlessly.
3-Two-1
by Todd Green
Range: 3yd - 7yd
Target: special (see below)
Start position: holstered
Rounds fired: 30
This is a close range drill focusing on speed and precision as well as the ability to change gears seamlessly. It uses a 3×5″ rectangle, a 2″ circle, and 1″ square. For simplicity’s sake, we have created a target specifically for this drill.

(click image for printable version)
Using a shot timer, give yourself a four-second PAR time. On the buzzer, draw and fire six rounds as follows:
- three rounds at the 3×5 rectangle
- two rounds at the 2″ circle
- one round at the 1″ square
Repeat the drill for a total of five runs. This should give you:
- fifteen hits in the 3×5 rectangle
- ten hits in the 2″ circle
- five hits in the 1″ square
For an added challenge, you can begin a string on a different shape. Note that the PAR time becomes more constraining when you have to draw to a smaller target. You can also change the orientation of the target from practice session to practice session so you don’t just build “muscle memory” moving in one direction.
Range can be anywhere from three to seven yards depending on shooter skill level. Start at a distance where you can hit all three of the targets when there is no time limit, and then push yourself to meet the PAR time. Record your results for each target (rectangle, circle, square) and work until you are getting good hits within the PAR time. Then increase the distance.
3×5 Card Drill
Range: 3yd, 5yd, 7yd, 10yd, & 15yd
Target: 3×5 card
Start position: any
Rounds fired: 6 at each distance
Shooter fires six rounds at the target at his own pace for maximum accuracy. For traditional double action guns, three shots should be double action and three shots should be single action in alternating sequence (double, single, double, single, double, single).
At three yards, the goal is to have all six bullet holes touching. After that, all shots need to hit the card. If all six shots hit the card, increase to the next distance.
For added challenge, use three cards and perform the drill freestyle, strong-hand only, and weak-hand only at each distance.
4×20 Transition Drill
designed by Scott Warren, named by Hosi
Range: 10yd
Target: four steel chest plates (or similar)
Start position: holstered
Rounds fired: 20
This drill is best run with four steel plates, but you can also use paper plates, sheets of paper, etc. Targets are placed at least two feet apart edge to edge at a range of ten yards. You will need a shot timer.
On the buzzer, draw and engage one shot per target back and forth for 20 rounds. Note that you do not “double” the targets on the end, you shoot them once and then reverse direction. So the sequence is: T1-T2-T3-T4-T3-T2-T1-T2, etc. There are no makeup shots. If you miss a shot, it’s a miss... move on to the next target.
The goal is to get all twenty hits in under 10 seconds.
Acceleration
designed by Todd Louis Green
Range: varies (start at 7yd)
Target: 8″ paper plate, 8.5×11 sheet of paper, or similar
Start position: mid draw
Rounds fired: varies
The purpose of this drill is to improve speed and in particular speed during the press-out segment of the draw stroke. The drill requires a shot timer.
Shooter begins seven yards from the target. Start position is the point where you normally make contact with your support hand during a draw. The gun will be relatively close in to your body, pointed at the target, both hands on the gun.
Set the PAR time on your shot timer to 1.0 seconds. On the buzzer, press the gun out and press the trigger, working on your sight alignment and timing so the shot breaks at the moment you reach full extension of your arms. If you finish with plenty of time left, slow yourself down and work on breaking a more accurate shot without going over the PAR time. Go through one or two magazines depending on whether you have a double- or single-stack mag.
Next, put up a new target. Without changing the par time, do the same drill except fire two shots per iteration. This might be easy for you, or it might require you to push yourself to break that first shot a little faster. Again, the goal is to get the most accurate shots you can without going over PAR. Fire the same number of drills (so you’ll fire two times as many shots).
If you were getting two shots in the 1.0 seconds, next try three, then four, and keep going until you can no longer get all your hits within the PAR time. You’ll have to speed up a little more each time. This drill should take you from smooth accurate single shots to pushing yourself to the very limit of your speed & accuracy.
Ball & Dummy Drill
Range: 3yd
Target: small (3×5 card, 3″ dot)
Start position: any
Rounds fired: varies
This drill has been used for decades to help shooters overcome problems anticipating recoil and jerking the trigger. It’s a staple of every instructor’s diagnostic toolbox.
You will need some snap caps or dummy rounds to do this drill. Have a shooting partner load your pistol magazine or revolver cylinder with about two-thirds live ammunition and one-third dummies, randomly mixed (alternatively, revolver shooters can just leave 1-3 chambers empty).
Using a small but close target as outlined above, aim and shoot. You should have no idea whether you’re pulling the trigger on a live round or a dummy, so treat every trigger press as if it were going to fire. When you get to a dummy round, the pistol should stay perfectly still as you press the trigger. If you jerk the trigger or anticipate recoil, you’ll immediately see it because the gun will move off target.
If you do jerk the gun on a dummy, stop and fire ten perfect, deliberate dry-fire shots without jerking the trigger or anticipating any recoil. Then do the Ball & Dummy Drill again.
This drill is only valid when you are shooting slowly and deliberately, working 100% on accuracy and zero on speed. As you start to shoot faster, it’s easy to mistake proper recoil management for “anticipation” and make you believe you are doing something wrong when you’re not.
Bill Drill
attributed variously to Bill Jordan, Bill Rogers, and Bill Wilson
Range: 10yd
Target: standard IPSC target
Start position: gun in holster, hands at sides
Rounds fired: 6
The Bill Drill is intended to improve speed without sacrificing accuracy. The details listed above are the traditional version, but any 6-shot drill done at speed on a single target can achieve the same basic goal.
Six shots are fired as quickly as the shooter can achieve six hits on the target. The drill teaches sight tracking, proper visual reference, recoil management, and trigger manipulation.
One important aspect of the Bill Drill is learning to follow your sights during recoil so that you can fire your next shot as soon as you have an adequate sight picture. Usually, this means pulling the trigger as soon as the front sight comes back down onto the scoring zone without waiting for precise alignment or for the sight to stop movement in the middle of the target. At full speed, the front sight is constantly moving, never coming to rest until the drill is over.
Catch-22
designed by Dave Sevigny
Range: 15yd
Target: MGM Auto-Popper or 8″ plate
Start position: varies (see below)
Rounds fired: varies (see below)
Dave Sevigny developed this drill to test draw speed and trigger control. It’s quite challenging. All you need is a steel target and a shot timer.
- Draw and fire (freestyle) until you get a hit on the target. Record your time. Repeat for a total of five draws.
- Draw and fire strong hand only until you get a hit on the target. Record your time. Repeat for a total of five draws.
- Draw, transfer gun to weak hand and fire weak hand only until you get a hit on the target. Record your time. Repeat for a total of five draws.
Remember, you fire however many shots you need to get a hit. At the end of the drill you should have a total of fifteen times recorded. Add them all together to get your score. All fifteen runs - 5 freestyle, then 5 SHO, then 5 WHO - have to be shot consecutively with no “free passes” or excuses.
The target needs to be put up against the berm to prevent rounds skipping out of the range on a bad draw. The target needs to be steel because you continue engaging it until you score a hit. If you used a paper target and realized after the fact that you missed a shot, you have no way to score your time for that run.
Dave considers anything under 23 seconds to be a Grand Master level score. His personal best is 20.71! If you are drawing from concealment, the “GM standard” is 26 seconds.
For a more “tactical” drill, you can do a standard weak hand only draw but keep in mind that this will be significantly slower for most people than the strong-to-weak transfer. Unless you have specific professional training in the safe execution of a weak hand only drawstroke, do not attempt it with a live gun.
Changing Gears
Range: 7yd
Targets: 3×5 card, 8″ plate
Start position: holstered
Rounds fired: 4+
This drill is intended to help shooters learn to change speeds as the situation requires. It uses two different size targets, a small (3×5 card) and a large (8″ plate). A shot timer is used set to a par time that pushes the shooter to shoot as quickly as possible while still getting hits. 3-4 seconds is a good start; once the shooter is getting a total of 5-6 hits per run, reduce the par time for a greater challenge.
There are two variants of the drill. Both should be practiced.
Slow-to-Fast
Draw, fire two rounds at the small target, then as many hits on the large target as possible before the par time runs out. This emphasizes a very precise draw and first shot, which is especially important on Traditional Double Action (DA/SA) guns. After hitting the small target twice, the shooter must speed up to get as many hits on the large target as possible within the par time.
Fast-to-Slow
Draw, fire two rounds at the large target, then as many hits on the small target as possible before the par time runs out. This emphasizes control, because the first two shots should be very fast and then the shooter should slow down to get his hits on the smaller target.
Alternative Targets
Other targets can be used to get the same effect (for example, the head box of an IDPA/IPSC target and the torso zone of the same) or two identical targets can be placed at different distances (e.g., 5 yards and 15 yards).
A more advanced version of this drill is the X-Drill (see below).
Circle Drill
attributed to George Harris, SIGARMS Academy
Range: 7yd
Target: 8″ plate
Start position: any
Rounds fired: 36
The Circle Drill is intended to teach students the relationship between speed and accuracy, and how time affects marksmanship fundamentals.
The drill begins by firing six rounds at the plate at a slow pace (1 shot per second). Repeat. This is fundamental marksmanship with little or no time pressure.
Next, pick up the pace. Fire six rounds at a moderate pace (2 shots per second). Repeat. This speed is the “comfort zone” for most shooters, they should still get reasonably good hits.
Finally, maximize speed by firing six rounds at a pace of about 4 shots per second (or as fast as possible if 4/second is faster than the gun can be kept under control). Repeat. This pace should push a shooter outside of his comfort zone and force him to work harder at recoil management and sight tracking. Accuracy will suffer but the goal is to keep 90%+ hits on the plate.
For added challenge, also perform the drill one-handed both strong- and weak-hand. Note that the times, especially the “fast” time, may need to be adjusted for one-handed shooting. The goal remains the same. First speed is slow marksmanship, second speed is a steady comfortable cadence, and finally maximum speed without losing control of the gun.
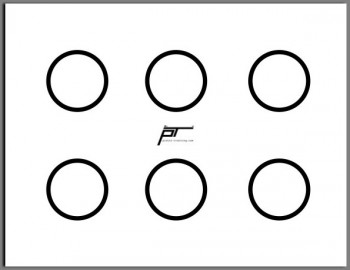
Dot Torture
This is a great marksmanship drill that came from David Blinder at personaldefensetraining.com.
Start at 3 yards. You have to get all 50 hits to pass. Once you can shoot the whole drill without a single miss, either increase the distance or add time pressure. For instance, try to finish the entire drill in under 5 minutes while maintaining 100% accuracy.

(click image for printable version)
- Dot 1 - Draw and fire one string of 5 rounds for best group. One hole if possible, total 5 rounds.
- Dot 2 - Draw and fire 1 shot, holster and repeat X4, total 5 rounds.
- Dots 3 & 4 - Draw and fire 1 shot on #3, then 1 shot on #4, holster and repeat X3, total 8 rounds.
- Dot 5 - Draw and fire string of 5 rounds, strong hand only, total 5 rounds.
- Dots 6 & 7 - Draw and fire 2 shots on #6, then 2 on #7, holster, repeat X4, total 16 rounds.
- Dot 8 - From ready or retention, fire five shots, weak hand only, total 5 rounds.
- Dots 9 & 10 - Draw and fire 1 shot on #9, speed reload, fire 1 shot on #10, holster and repeat X3, total 6 rounds.
El Presidente
attributed to Jeff Cooper
Range: 10m (11yd)
Target: three IPSC targets spaced 1yd from each other shoulder to shoulder
Start position: back to targets, hands above shoulders (“surrender position”), pistol concealed
Rounds fired: 12
At the start signal, turn, then draw and fire two rounds at each of the three targets. Perform a reload, then fire two rounds at each target again. There should be four hits on each target for a total of twelve.
The classic standard was to perform the drill in under ten seconds with all A-zone hits. Any run with less than 12 A-zone hits was a failure.
There have been many variations of this drill, including the “Vice-Presidente” which begins with the shooter facing the targets and which is usually performed at 7yd instead of 10m distance.
F.A.S.T. (Fundamentals, Accuracy, & Speed Test)
designed by Todd Green
Range: 7 yards
Target: 3×5 card (head), 8″ plate (body)
Start position: weapon concealed or in duty condition with all holster retention devices active; shooter facing downrange in relaxed stance with arms down at sides
Rounds fired: 6
Shooter loads gun with a total of two rounds. On start signal, shooter draws and fires two rounds at the head target; performs a slidelock reload; and fires four rounds at the body target.
You can see the progress of the test from slow precise head shots, to slidelock reload, to fast body shots very well in this clip:
Shooter Chris Frank tries the F.A.S.T. for the first time
Ranking:
10+ seconds: Novice
less than 10 seconds: Intermediate
less than 7 seconds: Advanced
less than 5 seconds: Expert
If shooter is using a retention holster and flap (covered) magazine pouches, subtract 0.5 seconds from the recorded time. If shooter is using an open-top retention holster (e.g., Blackhawk SERPA or Safariland ALS) with no concealment, add 0.50 seconds to the recorded time.
ToddG shoots the F.A.S.T. for about the 1,000th time
Official F.A.S.T. target:

(click image for printable version)
Hackathorn 3-Second Head Shot Standards
designed by Ken Hackathorn
Range: 5yd
Target: three IDPA or IPSC targets
Start position: varies (see below)
Rounds fired: 9
Targets are placed at least two feet apart shoulder to shoulder at a range of five yards. PAR time is set to three seconds for each string. There are three strings of fire.
- Fire one (and only one) shot at the head of each target, going from left to right
- Fire one (and only one) shot at the head of each target, going from right to left.
- Fire one (and only one) shot at the head of each target, beginning with the middle target and then finishing with the two outside targets in any order.
A round anywhere in the scoring zone for the head (meaning both A and B zones for the IPSC target) counts as a hit. Shots fired after the 3-second PAR time count as misses. In total, you will fire nine rounds (three shots in three seconds, times three strings of fire).
Hackathorn considers a passing score to be seven hits, minimum.
Try the drill first from a standard ready position. If you can get all your hits, try it from a holster. If you can get your hits from the holster within the PAR time, try it from concealment.
Langdon 3.5-second Standards
designed by Ernest Langdon
Range: varies (see below)
Target: three IDPA targets
Start position: from concealment
Rounds fired: 80
For this drill, you will need three IDPA targets placed at shoulder height with at least two feet of separation between each target. You will also need a shot timer, set to a 3.5-second PAR time. Each string has a 3.5-second PAR time. You must get all “-0” hits within the PAR time for each run. Dropping any points or going past the PAR time is considered a failure.
T1 is the left target; T2 is the center target, T3 is the right target.
Head-Body-Head: 7yd- two body T1; two head T2; two body T3.
- two body T3; two head T2; two body T1.
- two head T1; two body T2; two head T3.
- two head T3; two body T2; two head T1.
- two body T1; reload; two body T1.
- two body T2; reload; two body T2.
- two body on each target left to right while moving from 10yd to 5yd.
- two body on each target left to right while moving from 5yd to 10yd.
- two body on each target right to left while moving from 10yd to 5yd.
- two body on each target left to right while moving from 5yd to 10yd.
- 2 body on each target left to right, Strong Hand Only.
- 2 body on each target right to left, Strong Hand Only.
- 2 body on each target left to right, Weak Hand Only (start from low-ready).
- 2 body on each target right to left, Weak Hand Only (start from low-ready).
At the end, you should have 24 hits to the bodies of each T1 and T2; 20 hits to the body of T3; and four hits to each head. To get a passing score, Ernest requires the entire drill to be run twice with no misses and no shots fired past the PAR Time.
Langdon 9-second Standards
designed by Ernest Langdon
Range: varies (see below)
Target: three IDPA targets
Start position: from concealment
Rounds fired: 60
For this drill, you will need three IDPA targets placed at shoulder height with at least two feet of separation between each target. You will also need a shot timer, set to a 9-second PAR time. Each string has a 9-second PAR time. You must get all “-0” hits within the PAR time for each run. Dropping any points or going past the PAR time is considered a failure.
Vice Pres Modified: 7yd- two body on each; slidelock reload; two body on each Strong Hand Only.
- repeat
- two body on each; slidelock reload; two body on each (freestyle).
- repeat
- two body on each (freestyle).
- repeat
At the end, you should have 20 hits to the “-0” zone of the body of each target. To get a passing score, Ernest requires the entire drill to be run twice with no misses and no shots fired past the PAR Time.
Press Six
by Todd Green
Range: 3yd - 7yd
Target: special (see below)
Start position: holstered
Rounds fired: 62
This is a multi-string drill that will help you improve both your press-out skills and your ability to hit low probability targets at speed. It utilizes six 2″ circles as depicted in the target here:
(click image for printable version)
Range can be anywhere from three to seven yards depending on shooter skill level.
The six strings of fire are:
- Top left dot: Draw and fire one shot, focusing on a proper press-out. No time limit. Repeat ten times.
- Top center dot: Draw and fire one shot, focusing on a proper press-out. 3 second PAR time. Repeat ten times.
- Top right dot. Draw and fire one shot, focusing on a proper press-out. 2 second PAR time. Repeat ten times.
- Lower left dot: Draw and fire two shots, focusing on a proper press-out and good sight tracking. No time limit. Repeat five times.
- Lower center dot: Draw and fire two shots, focusing on a proper press-out and good sight tracking. 3 second PAR time. Repeat five times.
- Lower right dot: Draw and fire three shots, focusing on a proper press-out and good sight tracking. 3 second PAR time. Repeat four times.
Start at a distance where you can reliably get all of your hits on the slow strings (1 and 4), then push yourself to develop the speed necessary to make the PAR times. Once you are getting all of your hits on every dot, add a yard or two to the distance.
Pyramid
designed by “mlazarus”
Range: 5yd, 10yd, 15yd, 20yd, and 25yd
Target: 8″ paper plate or similar
Start position: holstered
Rounds fired: 10
Target is a standard 8″ paper plate. At the five yard line draw and fire two rounds into the plate as fast as you can make the hits. Move back to the 10 yard line and repeat this. Again from the 15, 20 and 25 yard line. This can also be run in reverse, starting at the 25 yard line and moving closer.
The purpose of the drill is twofold. One, develop the same draw speed for targets at all ranges and two, develop a sense of the sighting needs and front sight focus from various distances.
Reload Drill
Range: 7yd
Target: torso (8″ plate, sheet of paper, IPSC or IDPA target, etc.)
Start position: from the holster or ready position
Rounds fired: 4
At the start signal, present the weapon to the target, fire two rounds, reload, and fire two additional rounds.
(a common variation of this drill fires 1, reload, then 1 round; however, firing a second shot each time guarantees that the student is aiming and exercising proper shooting technique rather than rushing too fast)
To practice slidelock reloads, it is easiest to load your magazines with four rounds each, except for the first magazine in the gun which should obviously hold only two rounds. This way you can perform the drill and you’ll have two rounds left in the magazine at the end, allowing you to repeat the drill immediately.
Switch Hitting
designed by Todd Louis Green
Range: varies (start at 3yd)
Target: two 3×5 cards (slow version) or two 8″ plates (fast version)
Start position: ready position, strong hand only
Rounds fired: varies
safety notice: as with any drill involving transfer from one hand to the other, please remember to be careful. If you should drop the gun during the drill, let it fall to the ground and do not try to catch it in midair. If you try to catch it, the odds are very good that you’ll snatch the trigger and discharge the gun accidentally.
The purpose of this drill is to improve both accuracy and speed when shooting one-handed. There are two versions of the drill, a slow version which is focused primarily on accuracy and a fast version which balances accuracy and speed. Both drills require the shooter to use a shot timer with a PAR time of 10 seconds.
Slow Version
Place two 3×5 cards at least one foot apart at a range of three yards. Starting position is normal ready position for strong hand only (SHO) shooting. On the buzzer, engage the right card slowly until you get one hit. Then carefully transition the pistol to the weak hand only (WHO) and engage the left card until you get one hit. Keep transitioning back and forth from SHO to WHO until the PAR time runs out.
Practice until you are getting at least two hits on each card in the PAR time. Then, increase the distance to 5 yards and start again. Keeping adding distance until you can no longer get the necessary hits in the allowed PAR time.
Fast Version
Similar to the above except you will use two larger targets, such as 8″ plates or 8.5×11 sheets of paper. On the buzzer, engage the right target with two hits shooting SHO. Once you get your two hits, carefully transition to the WHO and engage the left target until you get two hits. Transition back and forth as many times as you can until the PAR time runs out.
Practice until you are getting at least four hits per card at 3yd within the 10 second PAR, then increase the distance to 5yd. Keeping adding distance until you can no longer get the required number of hits within the PAR time.
Tri-10
designed by “Gunslinger”
Range: 10yd
Target: Tran Star-II similar
Start position: holstered
Rounds fired: 10
safety notice: as with any drill involving transfer from one hand to the other, please remember to be careful. If you should drop the gun during the drill, let it fall to the ground and do not try to catch it in midair. If you try to catch it, the odds are very good that you’ll snatch the trigger and discharge the gun accidentally.
Set your shot timer to a PAR time of 10 seconds. On the buzzer, draw and engage the target as follows:
- fire 4 shots freestyle (both hands)
- transition gun to strong hand only
- fire 3 shots strong hand only
- transition gun to weak hand only
- fire 3 shots weak hand only
If the drill is too hard or too easy, you can adjust the size of the scoring zone, the distance, and/or the time limit. But the “official” version is 10 shots in 10 seconds at 10 yards.
Triple Nickel
designed by a Dept of Homeland Security agency’s firearms training unit
Range: 5yd
Target: five Tran Star-II or QIT targets.
Start position: holstered & concealed
Rounds fired: 10
Five targets are placed five yards from the shooter with at least 1.5 feet between each target.
Shooter begins with weapon concealed. On the buzzer, shooter must draw and engage each target with two shots. After the first target is engaged but before the last target is engaged, the shooter must perform a reload.
For a shot to count as a hit, it must be completely within the 4/5 scoring zones of a Tran Star-II target or within the bottle of a QIT target. Hits touching the line or outside the scoring zone are considered a miss.

The drill is called the Triple Nickel because the agency uses a five second standard to complete the drill. Shooters who can successfully perform the drill in under five seconds three times in a row with 100% hits are awarded a special commemorative coin. That is a draw from concealment, a reload, and ten hits on a total of five targets in under five seconds!
Special thanks to Great Bison (coin holder #7) for the detailed information and target graphics.
Triple Six
designed by Max Michel, jr of the U.S. Army Marksmanship Unit
Range: 7yd, 15yd, and 25yd
Target: standard IPSC target
Start position: holstered
Rounds fired: 18
Set up 3 targets [USPSA targets prefered]. There are three strings of fire.
- 7 yards - draw and fire 6 rounds [record time]
- 15 yards - draw and fire 6 rounds [record time]
- 25 yards - draw and fire 6 rounds [record time]
For each hit in the C zone add .20 seconds.
For each hit in the D zone add .50 seconds.
For any misses add 1.0 seconds.
Add the three raw times plus any scoring zone penalties.
A good goal to shoot for on this drill with a stock type production/SSP gun would beunder 9.0 seconds after all penalties are added. Max Michel’s personal best is reported to be 5.5 seconds total!
Wall Drill
developed by George Harris, SIGARMS Academy
Range: 0yd
Target: blank wall
Start position: any
Rounds fired: 0 (dry fire)
This is a dry-fire drill; all weapons must be completely unloaded and double-checked before the start of this drill.
Shooter stands with muzzle at eye level less than one inch from a blank wall. There should be no aiming points (targets, holes, light switches, etc.) to distract the shooter.
Shooter practices proper sight alignment, front sight focus, and trigger manipulation without the distraction of a target. Two-handed, strong-hand, and weak-hand shooting should be practiced. For TDA (traditional double action) pistols, both the double- and single-action trigger pulls should be practiced.
The goal is to maintain focus on the front sight, pulling the trigger without upsetting sight alignment.
Warren Advanced 3-Second Standards
designed by Scott Warren
based on the Ken Hackathorn 3-Second Standards
Range: varies (see below)
Target: three IPSC or IDPA targets spaced at least two feet apart shoulder to shoulder
Start position: holstered
Rounds fired: 63
A shot timer with PAR time set to three seconds is used for each string. There are three strings of fire for each stage of the drill:
- Fire one (and only one) shot at the head of each target, going from left to right in 3 seconds.
- Fire one (and only one) shot at the head of each target, going from right to left in 3 seconds.
- Fire one (and only one) shot at the head of each target, beginning with the middle target and then finishing with the two outside targets in any order in 3 seconds.
- From the holster, freestyle at 5yd.
- From the holster, freestyle at 7yd.
- From the holster, freestyle at 10yd.
- From the holster, freestyle at 15yd.
- From the holster, strong hand only at 5yd.
- From the ready position, support hand only at 5yd.
- From the holster, while moving. (advance from 10yd to 5yd on string 1, retreat from 5yd to 10yd on string 2, and advance again from 10yd to 5yd on string 3)
A round anywhere in the scoring zone for the head (meaning both A and B zones for an IPSC target) counts as a hit. Shots fired after the 3-second PAR time count as misses. You may not take any extra shots. In total, you will fire 63 rounds: three rounds per string, three strings per stage, 7 stages.
A score of 49 or above (averaging at least 7 hits per stage) is a real accomplishment.
X-Drill
Range: 7yd
Targets: two targets each with a head (3×5 card) and torso (8″ plate) scoring zone
Start position: holstered or ready
Rounds fired: 32
This is another variant of the Changing Gears (see above) drill. The purpose of this drill is to build realistic multiple target shooting skills, and to further develop a shooter’s ability to regulate the balance between accuracy and speed necessary to get hits against different size and distance targets.
You’ll create two targets, A and B. Each target will have a 3×5 card as a head zone, and an 8″ plate as a body zone. It should look like this:

Shooter draws and fires two rounds at each target zone in an “X” pattern. Drill is repeated four times, starting with a different zone each time.
1. A-head, B-body, A-body, B-head2. B-head, A-body, B-body, A-head
3. B-body, A-head, B-head, A-body
4. A-body, B-head, A-head, B-body
A key point in teaching and evaluating the X-Drill is that pairs fired at large body zones should be faster than pairs fired at small head zones. Shooters should learn to adjust their cadence to get off shots as fast as they can appropriate to the range and size of the target. If your head shots are just as fast as your body shots and you’re getting all hits, you need to be taking the body shots faster. Shoot at the speed the target allows.
all drills from pistol-training.com